This is the slave cylinder for the Magna’s hydraulically operated clutch. Disconnecting the oil line and removing three 8mm hex bolts allows the unit to be removed.
This spring, as I began going through my collection of clunker motorcycles to prepare for the promised thaw and possibility of riding weather, I got quite a shock. When I got to my 1984 Honda VF500C V30 Magna, I pulled in the clutch, and there was nothing. The usual resistance to lever movement was completely gone, indicating that the hydraulic clutch actuator was no more.
These are all the parts that are required to rebuild the slave cylinder: (from right) the oil seal, the piston seal, and the gasket.
This bike is among my all-time favorites, as it is my first V4 bike. It is light, super-quick, and a joy to ride. It is also the first bike I took to Bonneville way back in 2009. The VF500C carried me to over 100 mph on the salt, and it was had for the paltry purchase price of $400, including a trailer.
After only 42 years and 23,480 miles, the seals and gasket on the hydraulic clutch actuator slave cylinder finally started to leak during the winter. All the fluid was gone, leaving a wet stain on the floor. Yep, only 42 years and right away, trouble.
Fortunately, I’ve done clutch seal replacement on a 1985 Honda V40 VF700C V40 Magna, so tackling the V30 project seemed less intimidating for an all-thumbs DIY guy like me.
Glory days for the old V30 Magna and its even older rider; on the Bonneville Salt Flats in 2009, where the Magna reached 104.532 mph.
I obtained an official 1984-85 Honda V30 Magna service manual to do the initial restoration after I bought it, so I had the technical details of the work at my greasy fingertips.
Process tips: Always wear eye protection and nitrile gloves. Brake fluid can be nasty stuff on living tissue! Also cover all painted surfaces, as it is destructive to paint. This article is designed to be helpful to DIY types. However, it is not a substitute for the official Honda Service Manual for the V30 Magna. Follow the official process steps closely and wear protective gear as recommended in the service manual.
Finding that the job would require only fresh DOT 4 fluid (DOT 3 is also acceptable, though never mix the two when topping up), the gasket, oil seal, and piston seal, I sourced the fresh fluid locally and contacted David Silver Spares for the other parts.
I’ve turned to DSS several times in the past for hard-to-find vintage Honda parts, including sourcing those very rare OEM-spec four-into-four exhaust systems for the 1974 Honda CB350F and 1973 Honda CB500K2. The only things I couldn’t get from DSS for this job were skill and patience.
Honda part numbers
Oil seal: Honda part number: 91209-MBO-003
Slave cylinder gasket: Honda part number: 22862-KE7-000
Piston seal: Honda part number: 22865-MJ8-003
Parts source: David Silver Spares
Price: $30.44 (including shipping)
So, in the warmth of a late spring day with parts in hand, I organized a workspace in my pole barn and went at it.
Removing the plastic slave cylinder cover (two 8mm hex bolts) exposes the 12mm hex oil bolt that connects the hydraulic line to the slave cylinder and the cylinder itself, which is secured with three 8mm hex bolts of unequal length. Note which bolt goes in which hole.
Unbolting and removing the slave cylinder is easy. Use a catch basin because, even with a near-complete loss of fluid due to a leak, some fluid still escapes when the cylinder is removed. When disconnecting the oil line, take care to keep the two seal washers in place to prevent them from being lost. Be especially careful with the one that faces the cylinder.
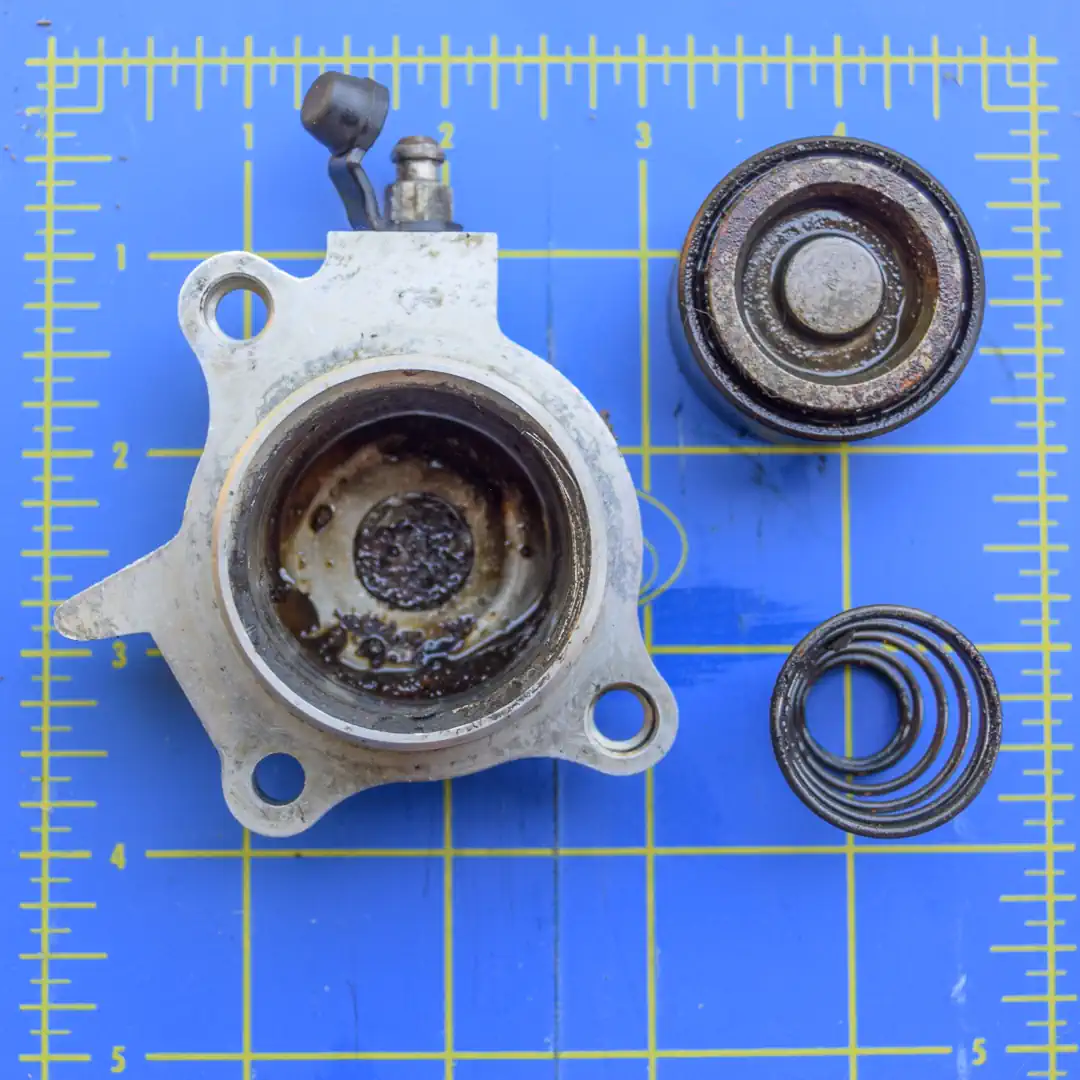
The cylinder (top), piston (lower right), and spring were surprisingly grimy as found when the slave cylinder was removed. Of course, it has been 42 years since they had seen the light of day.
Removing the twin dowel pins and the old gasket was not easy. One of the dowel pins was really tough to remove, and the gasket was stuck to the engine in some parts and to the slave cylinder in others. It must all be removed to allow the new gasket to seal securely surface-to-surface and prevent leaks.
Cleaning all the old gasket off required a single-edge razor blade and patience. It can be tricky to access the crankcase surfaces and ensure they are clean down to bare metal on both the crankcase and slave cylinder mating surfaces. Stuff like this is what makes working on old bikes such a time-consuming challenge, and it’s never mentioned in the service manual.
It was amazing to see how much black crud had accumulated on the clutch lift rod, oil seal, and the face of the piston. Getting the piston out of the cylinder is easiest done by forcing it out using compressed air into the fluid inlet, with the cylinder wrapped in a shop towel and the piston facing down on your workbench to catch it when it comes out.
The piston (center) holds the oil seal, and the original is on the left. The problem is that the old oil seal came out in pieces, one of which is on the right. The rest of it had to be dug out of the groove with the tiny precision screwdriver shown to allow the new seal to seat properly.
With the piston removed, the old piston seal, spring, and oil seal can be removed. Removing the spring and piston seal was easy; removing the oil seal was not. Though it appeared intact, it was degraded badly and came out in pieces. Its bottom edge stuck deep in the groove the new seal had to seat in.
I didn’t realize it initially, but there was enough of the old seal left in the groove to prevent the new seal from seating properly. Getting the old seal material out of that tiny groove required the use of the tiniest flat-blade precision screwdriver I had, as well as another dose of patience.
Cleaning the metal surfaces didn’t always leave them shiny. Some residual staining persisted, even though the surfaces were smooth. Once the clean-up was complete, it was time to check the piston and cylinder diameters with my digital Vernier caliper. The piston O.D. spec is 1.4035—1.4045 inches. Mine checked out ok at 1.404 inches, with no visible scoring or wear. The cylinder inside diameter spec is 1.4055—1.4079 inches. Mine was fine at 1.406 inches. The piston spring was intact.
Fully restored and back on the road, Honda’s smallest V4 power cruiser, the V30 Magna, is comfy, lightweight, and easy to ride.
With things cleaned up, the oil seal and piston seal could be installed. The piston seal must be installed with the upward taper rising toward the spring side of the piston. Lubricate the piston and piston seal with high-temp silicone grease or DOT 4 before assembly. Be sure to insert the piston squarely into the cylinder, with the piston seal facing outward.
Reinstall the two dowel pins and place the new gasket on the crankcase cover. Install the slave cylinder, placing it squarely on the dowel pins and flush to the crankcase. Take care to get the correct-length bolt into the correct hole—the two short ones are close in length but not the same—the longest of the three goes into the topmost hole. Tighten using an alternating pattern; no torque specs are provided for these bolts.
Reconnect the line at the oil bolt, making sure both sealing washers are in place. The torque setting for the oil bolt is 18-25 lb-ft.
Next, it was time to refill the master cylinder and bleed the system of air trapped inside. I didn’t use a MityVac or another bleeder pump, opting for the old air-bleed method. To my surprise, little air appeared in my drain line. However, the clutch felt too heavy, and it didn’t fully disengage when I checked it with the bike on the centerstand. Then, I remembered the lesson learned on the VF700 project.
The oil bolt on the master cylinder had to be cracked open briefly to allow air to escape to successfully bleed the system before the clutch would function normally.
If the feel of pressure at the lever doesn’t come up, or if it is heavier than normal and the clutch appears to drag, even when the clutch lever is pulled in, try cracking the oil bolt up on the handlebar.
To do this, take the rubber boot back out of the way that covers the oil bolt up on the master cylinder and put a 12mm open-end wrench on the hex bolt. Squeeze the lever and open the bolt while holding the lever down, and close the bolt before releasing the lever.
That did the trick. A small amount of fluid squirted out and a “PFFT” was heard. Repeating the process one more time gave me a normal feel at the lever, and the clutch fully disengaged when pulled in.
Normal function and no leaks anywhere after a 70-mile test run proved the repair successful.
A 70-mile test ride showed the job was done, except for the need to reinstall the slave cylinder cover. I left off during the test run, just in case any pressure problems or leaks developed. Now, the 1984 Honda VF500C V30 Magna is intact and back on the road!
Have you ever wanted to ride a real MotoGP track? Well, here’s your chance! Leod Escapes does all sorts of incredible touring experiences with the very best that Europe has to offer. Fabulous accommodation, incredible food, and motorcycles what more can you ask for! So for the trip of a lifetime, visit LeodEscapes.com and check out your dream vacation.
* * * * *
The 2026 Aprilia Tuono V4 Factory 1100 remains one of the purest expressions of excess in motorcycling, standing proudly as an example of two-wheeled wish fulfillment done right. There are no gimmicks, pangs of guilt, or disappointment in the Tuono V4 Factory; it is simply a damn good bike. Nic de Sena tells us all about why you need this exceptional motorcycle in your garage.
* * * * *
This year, ARCH Motorcycle shocked the MotoAmerica Mission Super Hooligan series by capturing their first historic race win. To explore the massive behind-the-scenes effort that fueled this success, we sit down with Executive Producers John Stevens and Chance Wright, of the new six-part docuseries, Hooligans: The ARCH Racing Project with Keanu Reeves & Gard Hollinger. In this segment, they give us an inside look at the show, which follows ARCH as they transition from building custom bikes to entering the high-stakes world of professional racing. Joining us alongside is Brad Knight from technical partner BDO. BDO USA serves as the official race tech and consulting advisor for ARCH Racing. Their technology partnership centers around a bespoke, AI-powered race intelligence platform designed to drastically optimize the team’s track performance. The AI side of this project focuses on taking raw race and telemetry data and transforming it into immediate, actionable insights for the crew. It’s a fascinating insight into the new technology that helps make them faster on track.
* * * * *
Our guest this episode is Paul Puma, President of the United States Motorcycle Coaching Association (USMCA) and a Relationship Manager for Wells Fargo Motorsports Division. He leads the organization in connecting riders with certified coaches to promote nationwide safety, skill development, and sport growth.
* * * * *
Here’s quick reminder to check out our monthly digital magazine. It’s filled with everything you want to read on motorcycling, including some things you’ve probably not seen elsewhere. It’s absolutely free and you will find it on the Apple App Store and of course on Google Play as well.
Don’t forget to leave us your comments on our social media—we’re on all the usual platforms at Ultimate Motorcycling. We love hearing your feedback… so good or bad, please let us know what you think. If there’s something you’d like us to cover, we’d love to hear those ideas too!
We use cookies and browser activity on this website
Functional
Always active
The technical storage or access is strictly necessary for the legitimate purpose of enabling the use of a specific service explicitly requested by the subscriber or user, or for the sole purpose of carrying out the transmission of a communication over an electronic communications network.
Preferences
The technical storage or access is necessary for the legitimate purpose of storing preferences that are not requested by the subscriber or user.
Statistics
The technical storage or access that is used exclusively for statistical purposes.The technical storage or access that is used exclusively for anonymous statistical purposes. Without a subpoena, voluntary compliance on the part of your Internet Service Provider, or additional records from a third party, information stored or retrieved for this purpose alone cannot usually be used to identify you.
Marketing
The technical storage or access is required to create user profiles to send advertising, or to track the user on a website or across several websites for similar marketing purposes.