This is where the project begins and ends. The hydraulic clutch slave cylinder lies beneath the grooved cover behind the left crankcase cover.
Loading...
0:00
▶
This is where the project begins and ends. The hydraulic clutch slave cylinder lies beneath the grooved cover behind the left crankcase cover.
Honda VF700C Clutch Rebuild
Back in the early 1980s when Honda introduced its latest shock to the system in the form of the DOHC V-4 superbikes – the Magna, Sabre and Interceptor – radical design innovation didn’t stop at the engines.
Honda also used this new radical approach with the clutch. Instead of the usual cable-actuated device, hydraulic actuation was introduced to make the clutch feel light, smooth and reliable. But, no matter how a system is designed, even the most reliable can wear out and be affected by weather and other conditions.
Take my 1985 VF700C Magna, for example. After only 29 years, the Magna’s clutch lever no longer disengaged the clutch. I’ve repaired cable-actuated clutches before, but the Honda’s hydraulic unit was uncharted territory.
After checking out the repair procedure in my copy of the Clymer Service manual (#M327) for Honda 700-1100 cc V-Fours—1982-1988, I decided to give it a try myself (the Haynes Owner’s Workshop Manual for Honda V45/65 & Magna VF700, 750 & 1100 V-fours #820 is also an excellent resource, as is the official Honda Service Manual for the 1985-86 VF700C Magna, part number 61MK301).
In the case of this bike, the master cylinder and reservoir on the handlebar did not appear to be a part of the problem; no leakage or signs of failure were present there. There was leakage from the slave cylinder, though.
Checking out the exploded diagram of the slave cylinder assembly in the manual, it appeared likely that only three small components might need replacement to make the repair: the small oil seal (Honda part number 91209-MBO-003), the larger diameter piston seal (Honda part number 22865-MBO-003) and the insulator (Honda part number 22862-MBO-307). Those parts totaled only $24.26, not including state and local taxes.
Armed with those parts, the Clymer manual and some basic tools including metric socket set, torque wrench, air compressor and parts cleaning gear, I was set to give it a shot. Following are step-by-step instructions of the task.
This is where the project begins and ends. The hydraulic clutch slave cylinder lies beneath the grooved cover behind the left crankcase cover.
The slave cylinder assembly bleeder at the top is cracked open to drain the system; the same arrangement is useful for bleeding air out after reassembly.
The slave cylinder assembly has the union (banjo) bolt entering dead-center and the bleeder at the top. Care must be taken not to lose the metal spacer located between the slave cylinder assembly and the back of the crankcase on the left.
The interior of the housing revealed nearly three decades of gunk. The clutch pushrod is at the center of the housing.
The slave cylinder assembly revealed evidence of accumulated leakage, gunkification of the hydraulic brake fluid (DOT 3) that had seeped past the seals and an acute need for clean-up and rebuild. The oil seal is at the center of the piston. Gunkification probably is not an actual technical term, but it sure seems to fit the situation.
Inside the slave cylinder piston is a conical coil spring and in the deep groove around the top is the piston seal.
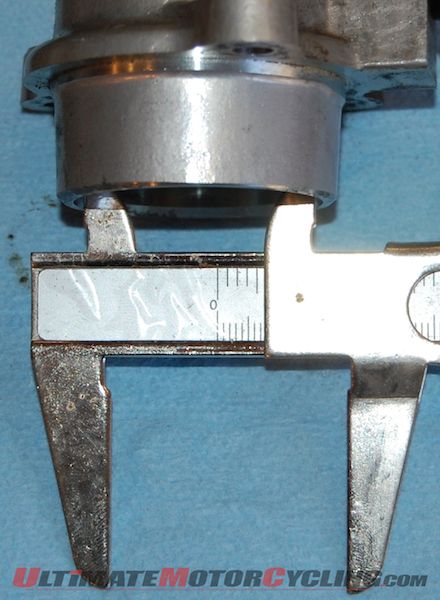
Check the inside diameter (I.D.) of the cylinder.
Check the outside diameter (O.D.) of the piston.
Once everything is cleaned and checks out, the cylinder can be reassembled.
To prevent the clutch lever accidentally being pulled when the system is open, it may be good to tape a block between the lever and handlebar.
Begin by removing the three bolts securing the cover over the slave cylinder, open the bleeder and attach a hose to drain the hydraulic (DOT 3 brake) fluid into a container, using the clutch lever to pump the fluid down.
After draining the system, close the bleeder and remove the union (banjo) bolt and sealing washers from the center of the slave cylinder housing. Be sure to have a catch basin below for any remaining fluid that may come out.
Remove the three bolts holding the slave cylinder to the crankcase and back the assembly out of the crankcase. The large insulator is between the flange of the slave cylinder assembly and the crankcase. You’ll need to keep the original if you didn’t purchase a new one.
To drive the piston out of the slave cylinder, gradually apply low pressure compressed air via the union bolt hole. Be sure to hold the assembly such that you can catch the piston into a clean cloth as it comes out—wear eye and hand protection in case it pops out with a little more force and residual fluid spray than you may expect. Don’t ask me how I know.
Remove the piston spring, piston seal and oil seal from the piston. About this time, an extensive cleaning process of all the metal parts will most likely be necessary. Once the parts are free of gunk, it is time to check the parts for wear with a Vernier caliper. Key dimensions are the outside diameter (O.D.) of the piston (1.4975-1.4990 in.) and inside diameter (I.D.) of the cylinder (1.5000-1.5024).
Reassembly is easier with a light coating of hydraulic fluid on the parts. Install the oil seal and piston seal. The oil seal is an easy install; the piston seal is a little more difficult and it is essential to make sure the seal is seated squarely in the groove around the piston with no twisting and that it is installed the right way, since it is not a simple O-ring.
Install the spring in the base of the piston and then use the clutch pushrod to drive the piston all the way into the cylinder then reinstall the pushrod. Place the insulator on the slave cylinder and reinstall it on the crankcase, using a criss-cross pattern in tightening the bolts—no torque specification is given for those.
Install the clutch hose union bolt and sealing washers on the slave cylinder. The torque specification for the union bolt is 18-25 lb/ft. Note that there is a slightly different procedure for 1986 and later models.
Remove the cap and diaphragm of the master cylinder up on the handlebar and refill and bleed the system with fresh DOT 3 fluid. If the air doesn’t seem to bleed out properly using the lower end bleeder, try cracking the banjo bolt up on the handlebar open and bleed air out there—that can cause the bleed problems.
Once that is done, reinstall the clutch slave cylinder cover, test the system one more time, and you’re done! Before you fire the engine up and go for a test ride, be sure to work the clutch lever to make sure it has the feel that goes with engaging and disengaging the clutch. Work the clutch and drop the transmission into first gear and make sure pulling the clutch lever in actually disengages the clutch before you try it with the motor running.
Final points: remember to protect painted surfaces from brake fluid, as it can damage them and get a manual to cover this and other repair procedures. This article includes more images of the procedure than most manuals on it but a manual can help tremendously. Always be sure to be familiar with the service procedure that applies to your bike and follow it closely. If you’re unsure about any of the steps or parts, check in with a professional on it.
Have you ever wanted to ride a real MotoGP track? Well, here’s your chance! Leod Escapes does all sorts of incredible touring experiences with the very best that Europe has to offer. Fabulous accommodation, incredible food, and motorcycles what more can you ask for! So for the trip of a lifetime, visit LeodEscapes.com and check out your dream vacation.
* * * * *
After a dozen years in limbo, the Super Glide is resurrected as a member of the Softail Cruiser family. The 2026 Harley-Davidson Super Glide arrives as a limited edition of 2500 units to celebrate the 250th anniversary of the United States of America. The new Super Glide proudly wears the iconic red, white, and blue of the 1971 original, and Don Williams tells us how this latest Softail feels on the road.
* * * * *
We’ve all heard the old saying, how you never see a motorcycle parked outside a psychiatrist’s office, right? Well, if you struggle with addiction and/or your mental health, then yes, you’ve probably figured out that motorcycles can be a big help. The Remix Racing Project is a California-based nonprofit and motorcycle racing team dedicated to raising awareness for mental health and addiction recovery. Founded by Jeremy Taubman and Shanea Makinson, Jeremy competes in the MotoAmerica Super Hooligan class and hosts fan-zone activities to provide resources and get conversations started. In this guest segment this episode Teejay and Jeremy chat candidly about going racing a little later in life, how it’s helping his own recovery, and what the Remix Recovery non-profit is achieving in helping others. Jeremy has published a book “Remix Recovery—Leading a Brave Space” and you can find it on Amazon. Needless to say, if you’re struggling with life’s challenges—and believe me—we understand, then visit The Remix Racing Project, click on the resources tab, and you’ll find help that’s just a phonecall or text away.
* * * * *
Here’s quick reminder to check out our monthly digital magazine. It’s filled with everything you want to read on motorcycling, including some things you’ve probably not seen elsewhere. It’s absolutely free and you will find it on the Apple App Store and of course on Google Play as well.
Don’t forget to leave us your comments on our social media—we’re on all the usual platforms at Ultimate Motorcycling. We love hearing your feedback… so good or bad, please let us know what you think. If there’s something you’d like us to cover, we’d love to hear those ideas too!
We use cookies and browser activity on this website
Functional
Always active
The technical storage or access is strictly necessary for the legitimate purpose of enabling the use of a specific service explicitly requested by the subscriber or user, or for the sole purpose of carrying out the transmission of a communication over an electronic communications network.
Preferences
The technical storage or access is necessary for the legitimate purpose of storing preferences that are not requested by the subscriber or user.
Statistics
The technical storage or access that is used exclusively for statistical purposes.The technical storage or access that is used exclusively for anonymous statistical purposes. Without a subpoena, voluntary compliance on the part of your Internet Service Provider, or additional records from a third party, information stored or retrieved for this purpose alone cannot usually be used to identify you.
Marketing
The technical storage or access is required to create user profiles to send advertising, or to track the user on a website or across several websites for similar marketing purposes.