After finding out the hard way (read costly) that the S1000RR shock wouldn’t fit on my 1991 Suzuki GSX-R 1100M Restomod project, I decided it was time to get serious about solving my rear suspension issues.
I had the OEM shock professionally cleaned up and serviced, but when I installed it, everything was wrong. The compression felt like I was sitting on a bag of marshmallows but the rebound felt more like a trampoline.
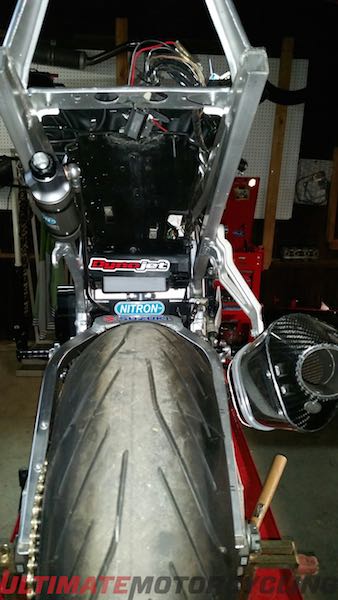
I knew it had nothing to do with my custom linkage as I have the adjustable dog bones to compensate for the extra length. I needed a new shock and i needed something good.
Some late nights were spent on the net doing extensive research on what route to take and all roads led me to the Nitron NTR R3.
I got on the phone to Mike Meister of Nitron USA and after convincing him that our bike was worthy of such a high spec component he agreed to send one over. Meister had the boys over in England set the shock up for the bike, riding style and my ever-increasing weight.
It was like being fitted for a custom suit. There is something very reassuring about giving your statistics to an engineer of a company as prolific as Nitron, I highly recommend it.
A couple of weeks later my UPS guy Bob pulled up, jumped out the truck, and rushed the package to me in the shop. He wasn’t leaving until he saw what was in the box that had me standing in the driveway waiting for him the last few days. We were not disappointed.
Exquisite CNC machining combined with quality anodizing and the trademark teal colour spring had us both drooling at the mouth.
The moment ruined as Bob asked “what is it ?”
I had the new shock on within a few minutes and checked the sag. Perfect !
Rebound feels spot on too. I guess Nitron’s F1 experience has paid off. These guys know their stuff. All I want to do is take it for a ride but that will have to wait until Chuck Frye is done painting the gas tank.
In the meantime I’ve hooked up the magnificent DynoJet Quick Shifter. Although I’ve ridden many bikes with a quickshift, installing and setting one up is a first for me.
Instructions are easy enough to follow and the aesthetics alone make it well worth the effort. It will be a week or two before I can get gas flowing through to make sure it works properly.
Be sure to check in on the next article when we bolt on the final pieces and hit the blacktop.
Have you ever wanted to ride a real MotoGP track? Well, here’s your chance! Leod Escapes does all sorts of incredible touring experiences with the very best that Europe has to offer. Fabulous accommodation, incredible food, and motorcycles what more can you ask for! So for the trip of a lifetime, visit LeodEscapes.com and check out your dream vacation.
* * * * *
The 2026 Aprilia Tuono V4 Factory 1100 remains one of the purest expressions of excess in motorcycling, standing proudly as an example of two-wheeled wish fulfillment done right. There are no gimmicks, pangs of guilt, or disappointment in the Tuono V4 Factory; it is simply a damn good bike. Nic de Sena tells us all about why you need this exceptional motorcycle in your garage.
* * * * *
This year, ARCH Motorcycle shocked the MotoAmerica Mission Super Hooligan series by capturing their first historic race win. To explore the massive behind-the-scenes effort that fueled this success, we sit down with Executive Producers John Stevens and Chance Wright, of the new six-part docuseries, Hooligans: The ARCH Racing Project with Keanu Reeves & Gard Hollinger. In this segment, they give us an inside look at the show, which follows ARCH as they transition from building custom bikes to entering the high-stakes world of professional racing. Joining us alongside is Brad Knight from technical partner BDO. BDO USA serves as the official race tech and consulting advisor for ARCH Racing. Their technology partnership centers around a bespoke, AI-powered race intelligence platform designed to drastically optimize the team’s track performance. The AI side of this project focuses on taking raw race and telemetry data and transforming it into immediate, actionable insights for the crew. It’s a fascinating insight into the new technology that helps make them faster on track.
* * * * *
Our guest this episode is Paul Puma, President of the United States Motorcycle Coaching Association (USMCA) and a Relationship Manager for Wells Fargo Motorsports Division. He leads the organization in connecting riders with certified coaches to promote nationwide safety, skill development, and sport growth.
* * * * *
Here’s quick reminder to check out our monthly digital magazine. It’s filled with everything you want to read on motorcycling, including some things you’ve probably not seen elsewhere. It’s absolutely free and you will find it on the Apple App Store and of course on Google Play as well.
Don’t forget to leave us your comments on our social media—we’re on all the usual platforms at Ultimate Motorcycling. We love hearing your feedback… so good or bad, please let us know what you think. If there’s something you’d like us to cover, we’d love to hear those ideas too!
We use cookies and browser activity on this website
Functional
Always active
The technical storage or access is strictly necessary for the legitimate purpose of enabling the use of a specific service explicitly requested by the subscriber or user, or for the sole purpose of carrying out the transmission of a communication over an electronic communications network.
Preferences
The technical storage or access is necessary for the legitimate purpose of storing preferences that are not requested by the subscriber or user.
Statistics
The technical storage or access that is used exclusively for statistical purposes.The technical storage or access that is used exclusively for anonymous statistical purposes. Without a subpoena, voluntary compliance on the part of your Internet Service Provider, or additional records from a third party, information stored or retrieved for this purpose alone cannot usually be used to identify you.
Marketing
The technical storage or access is required to create user profiles to send advertising, or to track the user on a website or across several websites for similar marketing purposes.