Mission accomplished—grab rail in place and seat reinstalled.
Mission accomplished—grab rail in place and seat reinstalled.
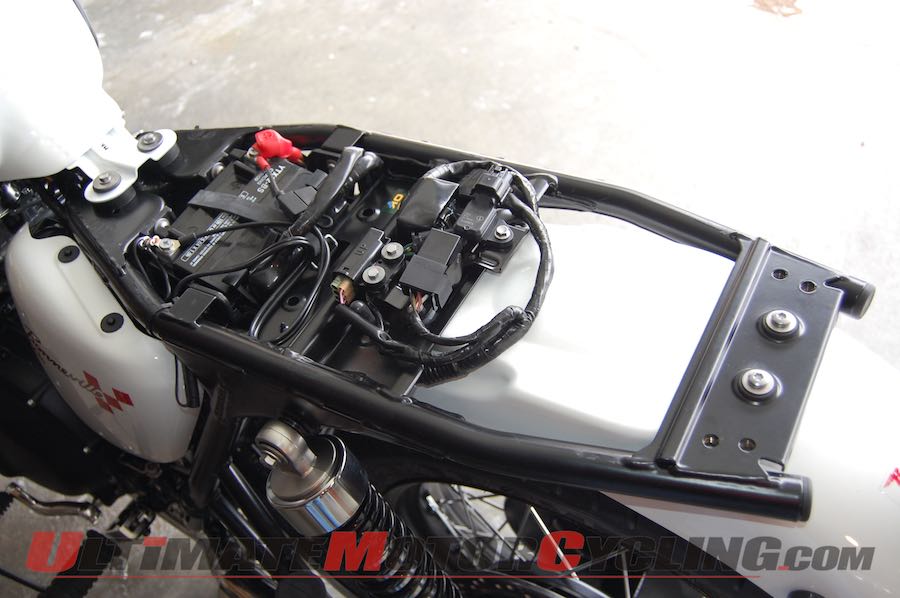
The landscape with the Triumph’s seat removed and before the grab rail is in place.
This is the rearward frame cross piece with the rear fender capscrews in place and the four pre-tapped grab rail mounting holes visible on each side.
The two zinc coated Torx head cap screws at each side of the cross piece among the wiring connectors are the front attachment screws for the rear fender.
Once the fender is lowered out of the way, the front grab rail mounting screws can be installed.
Once all the capscrews are installed and tightened down, the fender can be reinstalled.
Not long after I took delivery of a Triumph T214 Bonneville, I realized I had made a mistake – not in buying the bike, but by buying it without a passenger grab rail around the rear of the two-up seat.
While the bike looks leaner and cleaner without a grab rail, the simple fact is, it’s a lot easier to move the bike around with the grab rail and it provides a place to hook bungee cords and baggage to.
So, recognizing the error of my ways, I got in touch with Baxter Cycle in Marne, Iowa, ( HYPERLINK “http://www.baxtercycle.com/” http://www.baxtercycle.com/ ) where I got the bike and ordered the grab rail. Since the bike has a blacked out engine and black frame for the competition look it is designed to commemorate, I ordered the rail in black and it looks great and looks stout enough to pull stumps.
After getting some pointers on the installation from the folks at Baxter Cycle, I gathered up my ratchets, Torx T30 driver, thread locker and 5.0mm Allen wrench and went to work.
Much as I love this Triumph, I will admit to having no love for the way the seat attaches to the bike. Up front there is a molded-in hook that goes into an opening at the rear of the fuel tank. Twin steel hooks protrude down from the seat pan that also hook under a cross-piece on the frame and finally, at the rear, there are twin Allen head cap screws with stepped spacers that have to be removed to take the seat off.
It is a pain to take the seat off to get at the battery and all else that is tucked under the seat. The 5.0mm Allen wrench necessary to take the seat off is provided and is tucked in behind one of the side covers—which both also require a tool to remove.
Now, admittedly this is not a really big deal; an inconvenience at most, but it is ironic that as long ago as 1959, the Triumph line-up included models with the “hinged twinseat” feature that allowed the seat to be lifted in an instant.
Once the seat is removed, the next step is to drop the rear fender out of the way. The cap screws that secure the front of the grab rail must go into pre-tapped holes on the inside aspect of the top of the rear shock mount. There isn’t enough clearance to get them in with the fender in place, so disconnecting the fender and lowering it down out of the way is necessary. Only four Torx head cap screws hold the fender in place, so it is a quick task.
The next step is to slip the grab rail into place. Since it’s a little difficult to align things up under the rear of the frame, this takes a little fettling. To help hold the rail in the general area, it’s helpful to partially thread in one of the four cap screws that is provided that secure the rear of the rail to the rear-most frame cross piece.
Then, with a little threadlocker on each, the Torx head cap screws that secure the front ends of the grab rail can be threaded in—but don’t tighten them all the way just yet. Putting in the remaining three cap screws at the rear cross piece of the frame is a lot easier if the grab rail is loose enough to move around a little to align all the holes. Once all of them are started, again each with a little thread locker in place, then all the capscrews can be tightened down.
Next, the step I was sure would be a hassle—the reattachment of the fender. Much to my surprise—and delight—this step went easily. The four screws aligned with their respective holes easily and it was simple matter of re-tightening them.
Reinstalling the seat is the final step and the awkward process of trying to see and handle the two Allen head capscrews without dropping the stepped spacers or cross-threading the screws under the rear of the seat was completed. Total project time was a little over an hour.
Maybe somebody will offer a seat hinge kit sometime soon…hint hint.
Have you ever wanted to ride a real MotoGP track? Well, here’s your chance! Leod Escapes does all sorts of incredible touring experiences with the very best that Europe has to offer. Fabulous accommodation, incredible food, and motorcycles what more can you ask for! So for the trip of a lifetime, visit LeodEscapes.com and check out your dream vacation.
* * * * *
The 2026 Aprilia Tuono V4 Factory 1100 remains one of the purest expressions of excess in motorcycling, standing proudly as an example of two-wheeled wish fulfillment done right. There are no gimmicks, pangs of guilt, or disappointment in the Tuono V4 Factory; it is simply a damn good bike. Nic de Sena tells us all about why you need this exceptional motorcycle in your garage.
* * * * *
This year, ARCH Motorcycle shocked the MotoAmerica Mission Super Hooligan series by capturing their first historic race win. To explore the massive behind-the-scenes effort that fueled this success, we sit down with Executive Producers John Stevens and Chance Wright, of the new six-part docuseries, Hooligans: The ARCH Racing Project with Keanu Reeves & Gard Hollinger. In this segment, they give us an inside look at the show, which follows ARCH as they transition from building custom bikes to entering the high-stakes world of professional racing. Joining us alongside is Brad Knight from technical partner BDO. BDO USA serves as the official race tech and consulting advisor for ARCH Racing. Their technology partnership centers around a bespoke, AI-powered race intelligence platform designed to drastically optimize the team’s track performance. The AI side of this project focuses on taking raw race and telemetry data and transforming it into immediate, actionable insights for the crew. It’s a fascinating insight into the new technology that helps make them faster on track.
* * * * *
Our guest this episode is Paul Puma, President of the United States Motorcycle Coaching Association (USMCA) and a Relationship Manager for Wells Fargo Motorsports Division. He leads the organization in connecting riders with certified coaches to promote nationwide safety, skill development, and sport growth.
* * * * *
Here’s quick reminder to check out our monthly digital magazine. It’s filled with everything you want to read on motorcycling, including some things you’ve probably not seen elsewhere. It’s absolutely free and you will find it on the Apple App Store and of course on Google Play as well.
Don’t forget to leave us your comments on our social media—we’re on all the usual platforms at Ultimate Motorcycling. We love hearing your feedback… so good or bad, please let us know what you think. If there’s something you’d like us to cover, we’d love to hear those ideas too!
We use cookies and browser activity on this website
Functional
Always active
The technical storage or access is strictly necessary for the legitimate purpose of enabling the use of a specific service explicitly requested by the subscriber or user, or for the sole purpose of carrying out the transmission of a communication over an electronic communications network.
Preferences
The technical storage or access is necessary for the legitimate purpose of storing preferences that are not requested by the subscriber or user.
Statistics
The technical storage or access that is used exclusively for statistical purposes.The technical storage or access that is used exclusively for anonymous statistical purposes. Without a subpoena, voluntary compliance on the part of your Internet Service Provider, or additional records from a third party, information stored or retrieved for this purpose alone cannot usually be used to identify you.
Marketing
The technical storage or access is required to create user profiles to send advertising, or to track the user on a website or across several websites for similar marketing purposes.