
The Ultimate Motorcycling Honda CRF300L Rally Project Bike is underway. I learned many things in four years of working on the Ultimate Motorcycling Yamaha Ténéré 700 Project Bike. The most important lesson I learned is to try to take the bike apart only once. I disassembled and reassembled the Ténéré 700 more than 65 times. While I enjoy my garage time, it does get a little old taking off and putting back on all the plastic panels, over and over again. So, on this build, I set about to land all the project bits before beginning the build. It didn’t quite work out as planned, but it was close.

I was impatient to get to riding the Rally and, of course, some of the deepest fit parts came in after the leading group. But this time around the project build game, I knew what I wanted to change by the time the first oil change came around at 600 miles.
I have met, spoken with, emailed, forum-bantered, and texted with Honda CRF300L and Rally owners all over the US and Canada. Many love their stock bike and have no reason to change anything, and I get that. It is a great bike right out of the crate. I rode the bike on- and off-road with no modifications and the same-weight luggage, and it did it all at the speeds I like to ride at.
Still, could it be better and more comfortable with some bolt-on modifications? I believe so, and I will be sharing my modification experiences in this series. As the reviews go up, you’ll see the links in the list below.
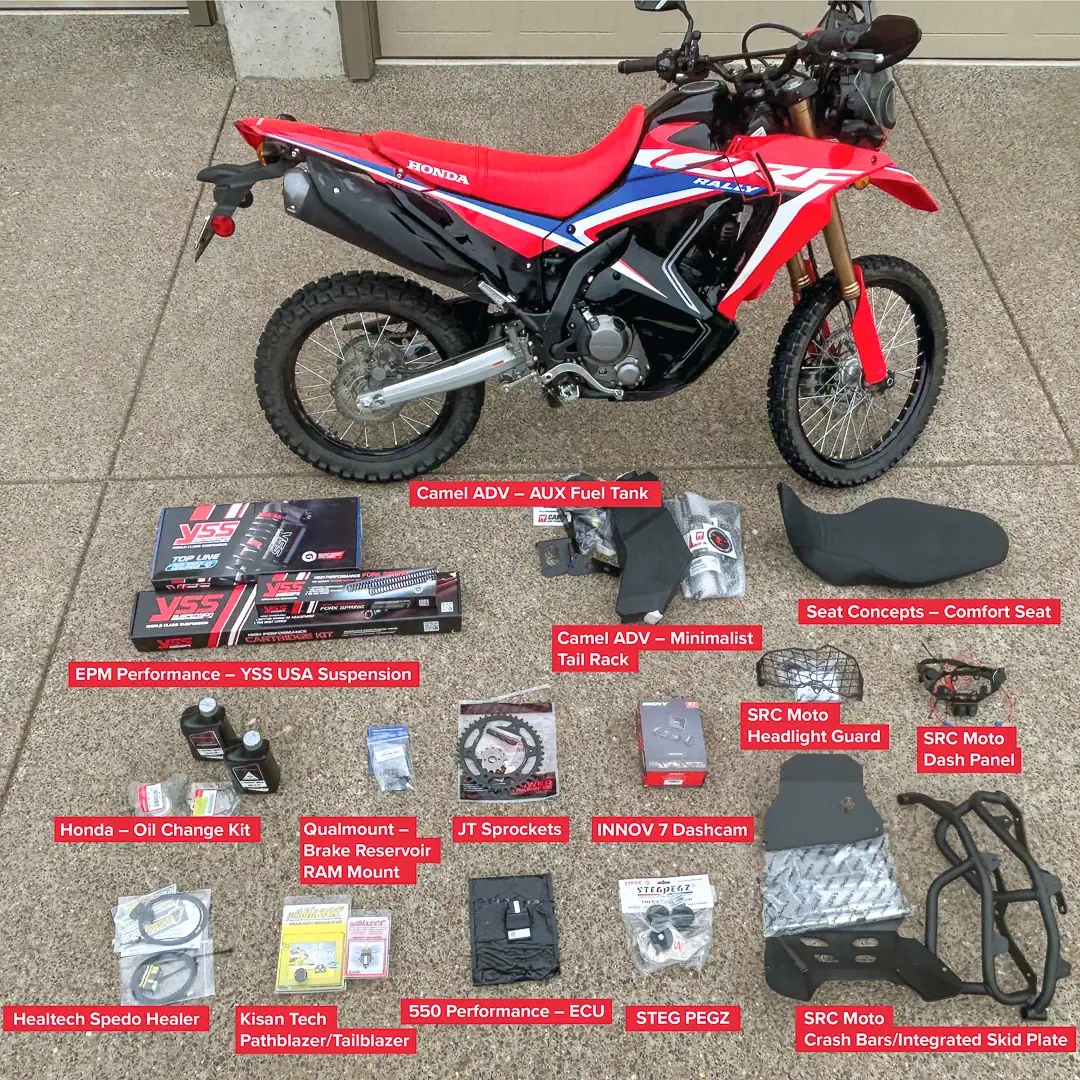
The parts layout photo is displaying the majority of the upgrades. I will be summarizing why I chose these specific parts and adding descriptions for the ones not in the photo. Each will have its own review, but I wanted to have the whole build (or almost the whole build) in hand before starting. Here is what I am adding and why.
The parts that have a favorable return on investment, in alphabetical order:
- 550Performance 87 Octane Stock ECU flash. This fixes the on/off jerkiness of the throttle at low speeds and adds low- and mid-range pulling power in each gear.
- Acerbis Endurance Handguards. The stock wind deflectors offer no hand or lever impact protection—this solves the problem. Not shown.
- Camel ADV Auxiliary Fuel Tank. This adds at least 85 miles of range, cutting fuel stops that are sometimes difficult when off-road touring.
- Camel ADV Minimalist Tailrack. This is a way to secure small or medium rackless saddlebags to the Rally.
- HammerLEDS Flex 4 Turn Signal. They are drop-proof and fully bendable, ultra, ultra bright turn signals. Not shown.
- HealTech Speed Healer. Changing gearing on the Rally will change the speedometer accuracy. The Speed Healer corrects for any gearing and tire size changes from stock.
- INNOVV K7 Dash Cam. This unit provides 2K resolution video documentation of my rides and potential evidence in the event of a crash.
- JT Sprockets — 13T front and 42T rear. I will be exploring how different final gearing changes performance.
- Kisan TailBlazer. This LED taillight flashes for four seconds when braking to catch the attention of cage drivers behind me. A Pathblazer headlight modulator will be added for extra visibility when riding where there are automobiles.
- QualMount Master Cylinder Cover. It utilizes unused handlebar real estate, allowing me to mount my phone.
- Seat Concepts Comfort Seat. Although I stand while off-road, riding to the great off-road areas can require as much as three hours of freeway or highway time, and my butt hurts on the OEM seat after 30 minutes.
- SRC Moto Crash Bars / Engine Guard. A small branch I ran over kicked up and broke the OEM plastic skidplate, front plastic splash guard, and could have taken out the left and right radiator shrouds—total replacement cost $695
- SRC Moto Dash Panel. Adds auxiliary power outlets and 2 switched outlets to the front of the bike where accessories need power.
- SRC Moto Headlight Guard. One errant rock or branch can break the headlight, with a replacement cost of $769.
- StegPegz. Because I stand all the time I am riding under 50 mph, the pegs’ leg support requires less energy use for standing over a long day, and gives base support to controlling the rear end of the bike on loose surfaces.
- SW-Motech 30mm handlebar risers. The reach for the controls required me to bend over at an uncomfortable angle on the stock CRF300L Rally. The 30mm risers placed the controls where they felt comfortable for long riding days.
- Touratech Adjustable Folding Mirrors. The stock mirrors are the first to hit the ground, even on a tip-over. I don’t want to ride with broken mirrors.
- YSS USA Suspension by EPM Performance. For the terrain I ride, and the speed I ride it, the rear shock needed to be replaced by a well-damped shock. The front suspension will also be modified due to the jarring my arms receive while riding over the terrain I normally ride on. Shock review.
Every item on my preference list (except the YSS front fork kit) can be installed by the average ADV bike owner with no special skills and with the same tool list you should be carrying on the trail with you. The upgrades are making the Ultimate Motorcycling Honda CRF300L Rally Project Bike more comfortable, more enjoyable, and safer.